
Start by making the opening noodle bar able to serve customers, then learn the route and information tools you need to maintain it. Keep the first grocery run, the first useful employee, and the current tutorial objective ahead of optional furniture or distant exploration. Before ending the session, make a manual save from the Pause Menu.
These Nivalis Nights tips organize the opening into a manageable sequence. The goal is a working starting routine, not a perfect menu, an automated empire, or every available quest completed on the first day. You can begin exploring more widely once leaving the neighborhood no longer immediately stops the business from functioning.
Follow one opening thread before collecting more errands
You begin in Lowtown with Ava guiding you toward the meeting in Meridian Market. Follow that introduction before treating every map marker as a task for today. It leads to the noodle bar handover and introduces the practical systems that give the following errands their purpose.
Meeting Thaddeus, finding the bar, and speaking with Banor form a useful anchor. When you are uncertain what to do next, return to the active opening objective rather than buying a new object simply because a shop offers it. There is a difference between something available to purchase and something your current task requires.
Do not use the size of the city as a measure of how quickly you should spread your attention. The first neighborhood already contains enough people, suppliers, and instructions to learn. Keeping the opening route compact leaves fewer unfamiliar systems competing for your attention at the same time.
Use this priority order for the first working day
| Priority | Immediate goal | Sign that you can move on |
|---|---|---|
| Reach the noodle bar | Complete the introduction in Meridian Market | You can access the venue and its management panel |
| Establish basic service | Follow the starting seating and menu objectives | The opening dish can be served |
| Complete the supply errand | Check the current Shopping List and return supplies | Required ingredients are in the venue's storage |
| Address the service task | Follow Banor's request for help | The relevant employee is assigned and working |
| Add the requested equipment | Continue the next active opening objective | You have the item the objective actually asks for |
| Finish safely | Check the route home and save your progress | You know where to stop and have made a manual save |
Treat the table as an order of attention rather than a clock schedule. Travel, conversations, and service can change how quickly you reach each point. If an objective takes longer, that is a reason to defer an optional trip, not a reason to skip the check that makes the next stage useful.
Get the first service working before improving its appearance
The initial furniture and menu instructions establish a functional venue. Complete them before decorating around a setup you have not yet seen operating. Watch for the basic result: a customer can use the seating and the food on the active menu has what it needs to be prepared.

This early observation is more valuable than immediately increasing capacity. A larger room or another table creates more work if the kitchen and service are already struggling. Seeing the small setup function gives you a reference point when later changes introduce a problem.
Separate a necessary purchase from an attractive purchase. If the active objective asks for equipment, that equipment belongs in your immediate plan. A decorative object, another property, or an appliance for a recipe you are not yet serving can wait. The early balance also has to support the next practical errand.
You do not need to solve long-term menu profitability here. The first objective is simply to understand the sequence from a selected dish to a customer receiving it.
Check the current Shopping List before leaving a vendor
The supply request can change while your restaurant is serving. A quantity remembered when you left the bar is not always the quantity still needed when you reach a supplier. Use the Shopping List as the current shortage check instead of treating the initial request as a permanently fixed shopping note.
Make one deliberate check before walking away from the market. That is an ordering habit, not a reason to buy a large surplus. It reduces the chance of returning with almost enough supplies and then wondering why the objective still has work remaining.
Bring the purchases back to the restaurant and put them into the appropriate venue storage. Having groceries in your personal inventory and having the kitchen supplied are different stages. If the objective remains active, check the remaining shortages and where the items are stored before concluding that the quest has failed.
Use the restocking guide for the detailed supply loop. For your first-day plan, the useful habit is to finish the supply loop before taking on another distant errand.
Keep cash available for the next required step
Several tempting purchases appear before you have a clear picture of the venue's recurring needs. Furniture, equipment, employees, and ingredients all require money. Spend first on the thing preventing the current objective from working, rather than buying every useful-looking item in advance.
Perishable ingredients can decay, so a very large grocery purchase is not automatically a safer purchase. A modest operation does not need the same stock as an expanded restaurant. Let the active menu and remaining shortage guide the immediate errand.
The inherited debt adds another reason to read the daily business feedback, but you do not need a complete strategy for making money before continuing the introduction. Learn which purchases are necessary now and keep enough flexibility to respond when the kitchen needs another supply run.
Avoid building the opening around an unverified money shortcut. You can progress by learning the intended systems without first selling your apartment contents or attempting an activity you do not understand. Those choices should not replace knowing how your current restaurant works.
Treat the first staffing request as a service checkpoint
Banor cannot indefinitely provide every part of a growing service by himself. When the introduction asks for a waiter, the purpose is to help food move from preparation to customers. Follow the request, then confirm that the new worker has the relevant role and a working period that matches the time you need help.
Hiring someone and having someone perform the intended job are different results. Before leaving the bar, look at what happens on the floor. Meals should continue moving without requiring you to personally solve every interruption.
This does not mean you need a complete roster on day one. More employees bring more decisions about coverage and pay. Start with the task the opening identifies, and use the staff hiring guide for the detailed recruitment controls.
Also distinguish the employees' happiness from customers' waiting expressions. They describe different people and problems. Read the panel or interaction associated with the issue instead of trying to fix every unhappy face through the same action.
Learn the panels before running back across the neighborhood
The venue interface is a useful place to check staff, menu information, and reviews. The journal also helps you look up known people and vendors. Before starting another walk, check whether the information you need is already available there.
For a supplier, look for what they sell rather than returning to every shop from memory. For a person connected to a task, review the dialogue and information you have already learned. Known entries are most useful after you have interacted with the relevant people, so those early introductions have practical value.
The point is to reduce unnecessary travel, not to replace every interaction with a menu. You will still need to move through the city and speak to people. Reading first makes that movement more purposeful and helps you avoid arriving somewhere without knowing what the trip was supposed to accomplish.
As your task list expands, repeat the same sequence: identify the current need, check the available information, then choose a destination. It is easier to keep a day manageable when each journey has a clear reason.
Keep the visible objectives readable
Multiple quest entries and compass markers can make the opening look busier than the task you are currently trying to finish. Use the active objective to identify the next step, and avoid treating every visible marker as an instruction to change direction immediately.
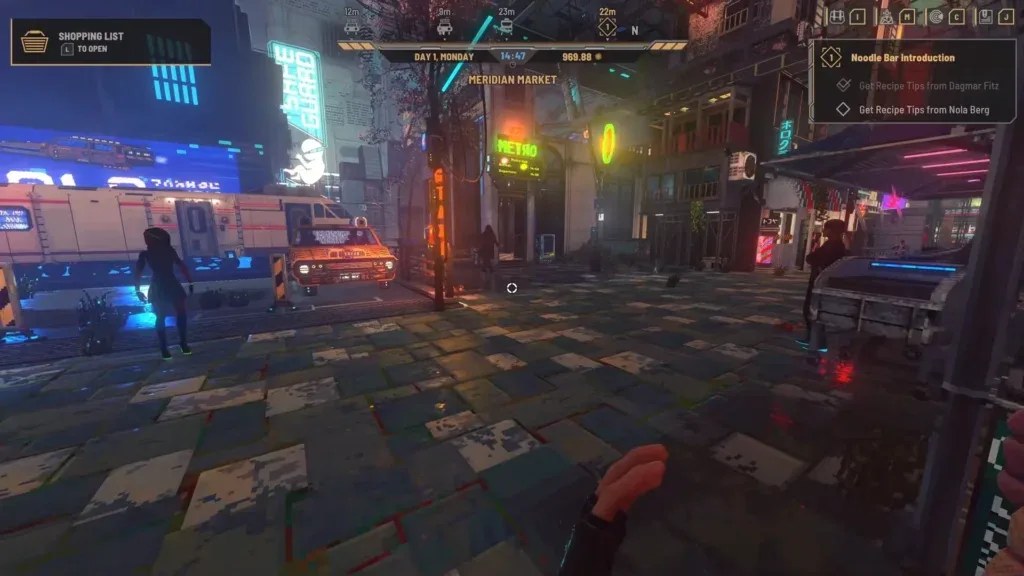
With the standard keyboard controls, holding J toggles the visible quest-log panel. This can give you a clearer view when the long list is distracting. Use the journal itself when you need to review the tasks rather than keeping all of them mentally active during every short walk.
Closing a panel does not complete its objectives. It simply lets you choose what information should occupy the screen while you work on one task. If a destination is unclear, check the task and its district again before following a numbered marker through the wrong area.
Reading the next instruction carefully often saves more time than trying to move faster between poorly chosen destinations.
Separate opening tasks from newly available possibilities
The introduction brings you into contact with other restaurant owners and recipe opportunities. Collecting an option does not require you to immediately build every appliance or add every dish associated with it. Continue the current requested sequence and leave the broader menu decisions for when you understand the supply routine.
The same principle applies to fishing, growing produce, furnishing a home, and exploring another district. These are valid activities, but each adds its own instructions and needs. Start one when you have enough attention for it, rather than because several opportunities appeared together.
A practical choice is to finish the nearest unfinished opening step first. You will then know whether the venue still needs you, whether a purchase is due, and how much of the day remains for a different activity. That makes the next trip a decision instead of a reaction to the newest marker.
Decide where the day ends before starting a long trip
Learn your starting apartment's map entry while the return journey is still straightforward. The map can offer a direct apartment destination in Lowtown, so returning home does not always require reconstructing the entire route from a taxi drop-off.
Check nighttime warnings before committing to another district. Curfew affects travel availability and changes the practical choices if you are still outside. Planning a return while the map remains usable is simpler than assuming it will always rescue an unfinished route later.
You do not need to memorize every shelter on the first day. You do need to recognize that safe stopping and daytime transit are part of your plan. If you are already caught by the nighttime restrictions, use the curfew guide and sleeping guide for that immediate problem instead of beginning another tutorial errand.
Save before you stop and review before you expand
Autosaving occurs at the end of the day, and a manual save is available from the Pause Menu during gameplay. Make that manual save before quitting, especially if you have finished useful work since the last end-of-day save. Completing an errand and preserving it are separate steps.
Before the next larger journey, review the basics once: the active menu has supplies, the service role you added is actually covered, and the next required purchase has not been crowded out by optional spending. If one of those is uncertain, settle it first.
You are ready to broaden your routine when the starting venue can continue serving while you are elsewhere for a reasonable trip. It does not need to be maximally profitable or fully automated. Choose one next interest, make that journey purposeful, and keep the simple checks that made the first service work.