
Start at the Docks: speak to Boardwalk Ady for a free fishing rod, equip it through the inventory hand icon, cast toward water and reel when the bite indicator changes to amber. This is the documented mouse-and-keyboard sequence; follow your current prompts if you remapped controls. A boat is unnecessary for your first shoreline catch.
Looking for a particular fish: use the finder below, then compare its source-reported conditions with the Fish Database in your current save. The full 24-name checklist is not a complete or gameplay-tested spawn guide.
Find a fish and its recorded conditions
Search by fish name, or combine a search with the condition-record and area filters. Each result links to that fish's cooking uses and supplier records. Those supplier districts show where an ingredient is sold; they do not show where it spawns.
The finder distinguishes areas reported by two checked guides, differing Stickleback area reports, and conditions that remain Not recorded here. The area filter matches the source label: choosing The Stacks will not include a fish listed separately as Anywhere (reported). A filtered list is not a guarantee or a complete list of what you can catch at that location.
Search 24 fish names and open their cooking records. Ten area records agree across two secondary guides; Stickleback has differing area reports, and thirteen records remain Not recorded. Filters match recorded source labels, not a complete list of fish catchable in an area. Conditions are source-reported, not gameplay-tested here; check your current Fish Database. Supplier districts are not fishing locations.
24 of 24 entries · Sources checked
Burbot
Area recorded
Source-reported fishing conditions; compare them with the Fish Database in your current save.
- Area
- Anywhere (source-reported)
- Time
- Any (source-reported)
- Weather
- Any (source-reported)
Two retained secondary guides agree on these conditions; this site has not gameplay-tested them. Check the current Fish Database before traveling. Supplier locations are not fishing locations.
Pike
Area recorded
Source-reported fishing conditions; compare them with the Fish Database in your current save.
- Area
- Anywhere (source-reported)
- Time
- Any (source-reported)
- Weather
- Any (source-reported)
Two retained secondary guides agree on these conditions; this site has not gameplay-tested them. Check the current Fish Database before traveling. Supplier locations are not fishing locations.
Stickleback
Conflicting area reports
Source-reported fishing conditions; compare them with the Fish Database in your current save.
- Area
- Source reports differ — check your current Fish Database
- Time
- Any (source-reported)
- Weather
- Any (source-reported)
Two retained guides report Anywhere, while an illustrated Database entry lists Docks, Mountain Town and Sewers. The available sources do not resolve the difference. Time and weather below are source-reported by the two guides, not gameplay-tested here. Supplier locations are not fishing locations.
Rudd
Area recorded
Source-reported fishing conditions; compare them with the Fish Database in your current save.
- Area
- Industrial District (source-reported)
- Time
- Night (source-reported)
- Weather
- Sunny, Rainy, Stormy (source-reported)
Two retained secondary guides agree on these conditions; this site has not gameplay-tested them. Check the current Fish Database before traveling. Supplier locations are not fishing locations.
Crucian
Area recorded
Source-reported fishing conditions; compare them with the Fish Database in your current save.
- Area
- Seaside Boardwalk (source-reported)
- Time
- Day (source-reported)
- Weather
- Rainy, Stormy, Cloudy (source-reported)
Two retained secondary guides agree on these conditions; this site has not gameplay-tested them. Check the current Fish Database before traveling. Supplier locations are not fishing locations.
Volga Zander
Area recorded
Source-reported fishing conditions; compare them with the Fish Database in your current save.
- Area
- The Stacks (source-reported)
- Time
- Day (source-reported)
- Weather
- Sunny, Rainy (source-reported)
Two retained secondary guides agree on these conditions; this site has not gameplay-tested them. Check the current Fish Database before traveling. Supplier locations are not fishing locations.
Ide
Not recorded
A recorded fish name with a matching cooking ingredient; fishing conditions have not been cross-checked here.
- Area
- Not recorded
- Time
- Not recorded
- Weather
- Not recorded
A complete table exists in one retained guide, but these conditions lack a second checked source. Not recorded does not mean any district, time or weather. Read your current Fish Database; supplier locations are not fishing locations.
Carp
Not recorded
A recorded fish name with a matching cooking ingredient; fishing conditions have not been cross-checked here.
- Area
- Not recorded
- Time
- Not recorded
- Weather
- Not recorded
A complete table exists in one retained guide, but these conditions lack a second checked source. Not recorded does not mean any district, time or weather. Read your current Fish Database; supplier locations are not fishing locations.
Lake Trout
Not recorded
A recorded fish name with a matching cooking ingredient; fishing conditions have not been cross-checked here.
- Area
- Not recorded
- Time
- Not recorded
- Weather
- Not recorded
A complete table exists in one retained guide, but these conditions lack a second checked source. Not recorded does not mean any district, time or weather. Read your current Fish Database; supplier locations are not fishing locations.
Bream
Area recorded
Source-reported fishing conditions; compare them with the Fish Database in your current save.
- Area
- Seaside Boardwalk (source-reported)
- Time
- Day (source-reported)
- Weather
- Cloudy, Dusty, Foggy (source-reported)
Two retained secondary guides agree on these conditions; this site has not gameplay-tested them. Check the current Fish Database before traveling. Supplier locations are not fishing locations.
Brook Trout
Not recorded
A recorded fish name with a matching cooking ingredient; fishing conditions have not been cross-checked here.
- Area
- Not recorded
- Time
- Not recorded
- Weather
- Not recorded
A complete table exists in one retained guide, but these conditions lack a second checked source. Not recorded does not mean any district, time or weather. Read your current Fish Database; supplier locations are not fishing locations.
Tench
Area recorded
Source-reported fishing conditions; compare them with the Fish Database in your current save.
- Area
- The Stacks (source-reported)
- Time
- Night (source-reported)
- Weather
- Sunny, Rainy (source-reported)
Two retained secondary guides agree on these conditions; this site has not gameplay-tested them. Check the current Fish Database before traveling. Supplier locations are not fishing locations.
Dace
Not recorded
A recorded fish name with a matching cooking ingredient; fishing conditions have not been cross-checked here.
- Area
- Not recorded
- Time
- Not recorded
- Weather
- Not recorded
A complete table exists in one retained guide, but these conditions lack a second checked source. Not recorded does not mean any district, time or weather. Read your current Fish Database; supplier locations are not fishing locations.
Grayling
Not recorded
A recorded fish name with a matching cooking ingredient; fishing conditions have not been cross-checked here.
- Area
- Not recorded
- Time
- Not recorded
- Weather
- Not recorded
A complete table exists in one retained guide, but these conditions lack a second checked source. Not recorded does not mean any district, time or weather. Read your current Fish Database; supplier locations are not fishing locations.
Perch
Not recorded
A recorded fish name with a matching cooking ingredient; fishing conditions have not been cross-checked here.
- Area
- Not recorded
- Time
- Not recorded
- Weather
- Not recorded
A complete table exists in one retained guide, but these conditions lack a second checked source. Not recorded does not mean any district, time or weather. Read your current Fish Database; supplier locations are not fishing locations.
Roach
Not recorded
A recorded fish name with a matching cooking ingredient; fishing conditions have not been cross-checked here.
- Area
- Not recorded
- Time
- Not recorded
- Weather
- Not recorded
A complete table exists in one retained guide, but these conditions lack a second checked source. Not recorded does not mean any district, time or weather. Read your current Fish Database; supplier locations are not fishing locations.
Ruffe
Not recorded
A recorded fish name with a matching cooking ingredient; fishing conditions have not been cross-checked here.
- Area
- Not recorded
- Time
- Not recorded
- Weather
- Not recorded
A complete table exists in one retained guide, but these conditions lack a second checked source. Not recorded does not mean any district, time or weather. Read your current Fish Database; supplier locations are not fishing locations.
Sabrefish
Not recorded
A recorded fish name with a matching cooking ingredient; fishing conditions have not been cross-checked here.
- Area
- Not recorded
- Time
- Not recorded
- Weather
- Not recorded
A complete table exists in one retained guide, but these conditions lack a second checked source. Not recorded does not mean any district, time or weather. Read your current Fish Database; supplier locations are not fishing locations.
Zope
Not recorded
A recorded fish name with a matching cooking ingredient; fishing conditions have not been cross-checked here.
- Area
- Not recorded
- Time
- Not recorded
- Weather
- Not recorded
A complete table exists in one retained guide, but these conditions lack a second checked source. Not recorded does not mean any district, time or weather. Read your current Fish Database; supplier locations are not fishing locations.
Zander
Area recorded
Source-reported fishing conditions; compare them with the Fish Database in your current save.
- Area
- The Stacks (source-reported)
- Time
- Day (source-reported)
- Weather
- Sunny, Rainy (source-reported)
Two retained secondary guides agree on these conditions; this site has not gameplay-tested them. Check the current Fish Database before traveling. Supplier locations are not fishing locations.
Taimen
Area recorded
Source-reported fishing conditions; compare them with the Fish Database in your current save.
- Area
- The Stacks (source-reported)
- Time
- Day (source-reported)
- Weather
- Rainy, Foggy, Stormy (source-reported)
Two retained secondary guides agree on these conditions; this site has not gameplay-tested them. Check the current Fish Database before traveling. Supplier locations are not fishing locations.
Whitefish
Area recorded
Source-reported fishing conditions; compare them with the Fish Database in your current save.
- Area
- The Stacks (source-reported)
- Time
- Night (source-reported)
- Weather
- Sunny, Rainy, Stormy, Foggy, Cloudy (source-reported)
Two retained secondary guides agree on these conditions; this site has not gameplay-tested them. Check the current Fish Database before traveling. Supplier locations are not fishing locations.
Rainbow Trout
Not recorded
A recorded fish name with a matching cooking ingredient; fishing conditions have not been cross-checked here.
- Area
- Not recorded
- Time
- Not recorded
- Weather
- Not recorded
A complete table exists in one retained guide, but these conditions lack a second checked source. Not recorded does not mean any district, time or weather. Read your current Fish Database; supplier locations are not fishing locations.
Salmon
Not recorded
A recorded fish name with a matching cooking ingredient; fishing conditions have not been cross-checked here.
- Area
- Not recorded
- Time
- Not recorded
- Weather
- Not recorded
A complete table exists in one retained guide, but these conditions lack a second checked source. Not recorded does not mean any district, time or weather. Read your current Fish Database; supplier locations are not fishing locations.
Source review: October 22, 2026. Conditions are reports from the linked guides, not first-hand testing by this site. Official Update 5 and the October 16 patch were also reviewed; they do not establish a complete current fish-spawn table.
Use the Fish Database before hunting a specific fish
Once the first catches are recorded, open the Fish Database and read the species' revealed district, time, and weather information. Missing data is not an all-weather guarantee. Whisper's illustrated fishing guide documents the Detector, Database, and boat scanner interface, including a Stickleback entry listing Docks, Mountain Town, and Sewers. Two other guides label its area Anywhere. This page does not resolve that difference or treat either report as an exhaustive current spawn rule.
Swipe horizontally to see all columns.
| Tool or screen | What to use it for | Next action |
|---|---|---|
| Fish Database | Revealed species conditions and tier progress | Finish entries the current tier identifies before guessing later conditions |
| Fish Detector | Locating concentrations of fish | Compare a detected area with the species' Database clues |
| Boat scanner | Separating fishing activity from submerged-object signals | Stop at the appropriate signal for the current fish or object objective |
| A fish's recorded entry | Planning a repeat catch | Follow its own conditions instead of assuming all early fish share one spot |
The illustrated guide describes yellow pulses as submerged objects rather than fish schools. Use the current scanner label and active objective to distinguish fish activity from salvage. A signal alone does not establish that the next catch is the quest object you need.
For offshore access, follow the Putter registration steps. Keep fish intended for a restaurant in the appropriate venue storage, and plan a curfew return before committing to another water route.
Use the 24 entries in the finder as your discovery checklist. Check revealed conditions in your own Fish Database before setting a route. The sale examples below are guide-author observations, not guaranteed prices.
Start fishing from the shore
To start fishing in Nivalis Nights, visit the Docks and speak to Boardwalk Ady on the pier. He gives you a free fishing rod. Open your inventory with I, equip the received rod using its hand icon, aim at water, and left-click to cast. Wait until the fishing face icon turns amber, then left-click again to reel in. You do not need to own a boat to begin fishing from the boardwalk or the canals near the Docks.
These are the mouse-and-keyboard controls documented for the launch build. Controller support exists, but the exact fishing button mapping has not been verified here. Use the prompts displayed by your current control setup rather than copying buttons from another fishing game.
Reach Boardwalk Ady at the Docks
The first useful destination is the Docks, where you can obtain the rod without purchasing one. From Meridian Market, check the taxis on the southwest side and look for the destination Take Cab to Docks. Confirm the destination before boarding; another taxi can take you somewhere that does not help with this first fishing trip.
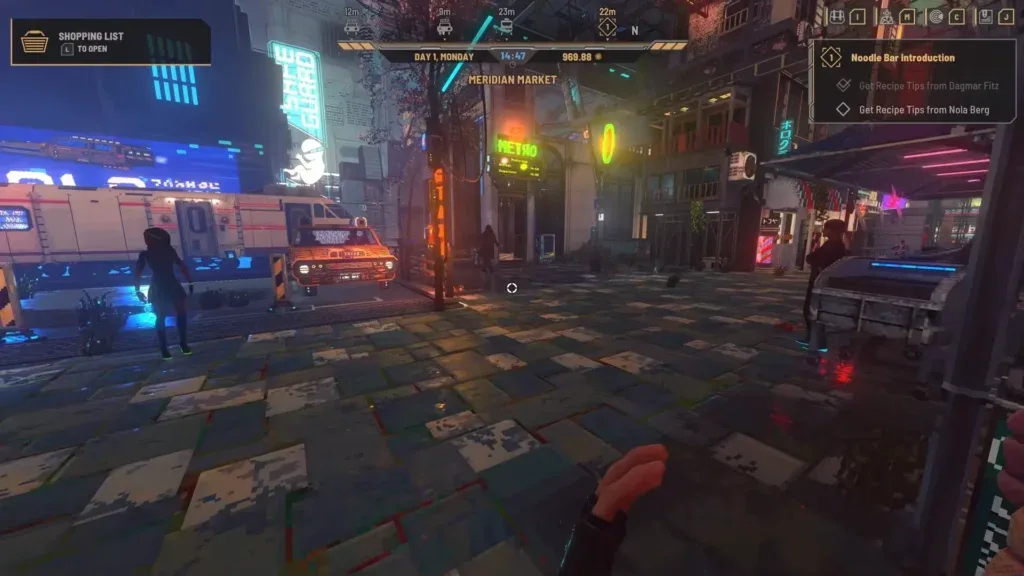
Check the destination and route shown in your current save.
After arriving, walk down the ramps toward the main dock area. Look for a fishing trawler and a small rowboat positioned beside each other near the bottom. Ady fishes on the pier on the other side of those boats. Speak with him to receive his spare fishing rod.
The boats are landmarks for finding Ady, rather than proof that you already own either vessel. Your initial goal is the conversation and rod. Boat ownership follows its own quest progression and is unnecessary for the basic shoreline controls described below.
If the Docks is already discovered in your save, inspect its available destination on the map. The game's navigation guidance allows fast travel to areas previously discovered through taxi, train, or boat travel. A district appearing on the city map is not the same as having its fast-travel route available, so check the state shown in your current save.

Check the destination and route shown in your current save.
Use the active objective and displayed destination to confirm your route. Do not assume a fixed universal travel cost, achievement-point requirement, or dialogue prerequisite when it is not shown. The confirmed opening route is to reach the Docks, identify Ady beside the pier landmarks, and speak to him for the free rod.
Equip the rod you received
Receiving the rod does not automatically place it in your hand. If you reach the water and nothing happens, check equipment before assuming fishing is unavailable.
- Press I to open your inventory.
- Find the fishing rod you received from Ady in the item list.
- Click the hand icon beside its name to equip it.
- Return to the game view and face an accessible stretch of water.
- Check that you are attempting to cast with the rod equipped.
This distinction between owning and equipping is the first important troubleshooting step. An item can be present in inventory without being selected for use. Buying more equipment or traveling to a different district does not solve that state if the free rod is still unequipped.
Guide sources disagree on the starter rod name: some still call it Rusty Fishing Rod, while ScreenHype reports that an October 1 rename identifies Ady's better rod as Iron Cast S. Check the actual item in your inventory; you do not need to buy a replacement merely because its name differs from an older guide.
The boardwalk and canals near the Docks are documented starting places. Begin there so that you can learn the indicator sequence close to the NPC who gave you the rod. You do not need to search the entire city for a hidden first-cast location.
For an equipment upgrade, use the fishing rod acquisition and comparison guide. Compare the actual range, luck and price in your inventory or vendor window. An expensive rod does not establish a species’ district, time or weather requirement.
Cast and read the fishing indicator
The basic mouse-and-keyboard sequence uses two timed clicks:
- Aim your crosshair at water.
- Left-click to cast.
- Wait while the face icon shows the waiting state.
- When it turns amber, left-click again to reel in.
- Read the result before beginning another cast.
The face icon communicates the current state:
Swipe horizontally to see all columns.
| Indicator color | Meaning | Your next action |
|---|---|---|
| Blue | Waiting for a bite | Continue waiting for the hooked state |
| Amber | Something is hooked | Left-click to reel in |
| Yellow-green | Catch successful | Inspect the result, then continue if desired |
| Red | Catch failed | Begin a new attempt and watch the next indicator sequence |
An amber indicator does not guarantee that the hooked object is a fish. The catch can also be trash. A successful catch state therefore means you obtained something, rather than proving that a specific fish objective advanced.
Wait for the indicator instead of repeatedly clicking while it remains blue. The documented timing cue is the change to amber; no exact fixed number of seconds between cast and bite has been established. A remembered waiting time is less useful than the visible state on the current cast.
If a catch fails, start another attempt without inventing an additional minigame input. The supported opening procedure is to cast, wait for amber, and reel in. Rod durability, bait consumption, tension bars, and hold-to-reel mechanics should not be assumed from unrelated games.
Complete Ady's first fish request
After your first catch, return to Ady for the next step of Underground Fish Market. The current quest reference records this order:
Swipe horizontally to see all columns.
| Requested fish | Quantity |
|---|---|
| Burbot | 2 |
| Stickleback | 2 |
| Pike | 3 |
The launch guide recorded one Stickleback; the current quest record lists two. Use the active journal requirement in your save if it differs. Keep those fish available if you intend to complete his request. Selling every catch immediately can leave you needing to catch the same requested species again. Compare your inventory with the requested quantities before deciding what is surplus.
Once the requested fish are delivered, the documented reward is access to the Underground Fish Market. This is separate from obtaining the rod: you can begin basic fishing before completing the market request. It is also separate from becoming a boat owner.
A successful catch of the wrong species is still a catch, but it does not satisfy a requirement for Burbot, Stickleback, or Pike. Read the actual item name instead of treating every fish-shaped inventory entry as interchangeable. Trash also does not count toward the requested fish quantities.
The available launch-build information does not establish guaranteed catch probabilities or a special technique for forcing those three species. Continue using the supported indicator sequence and check the inventory after each result. Avoid a supposed guaranteed spot or bait combination unless it is shown and supported for the game you are playing.
Decide whether to sell or keep a catch
Fishing has two documented uses beyond discovery: supplying restaurant ingredients and selling catches on the market. Decide which use serves your current needs before clearing the inventory.
Keep a catch when it belongs to Ady's outstanding request or when a recipe on your active restaurant menu specifically requires it. Check the recipe's ingredient field; owning a fish does not establish that every fish dish can use it. Transfer restaurant supplies into the relevant venue inventory rather than leaving them only in your personal inventory.
Sell a catch when it is surplus to those immediate needs and cash is more useful than keeping the ingredient. Freshness matters because decaying fish can sell for substantially less. Prices vary with the day, buyer, and condition, so inspect the current offer instead of relying on a fixed profit-per-cast claim.
The following ScreenHype observations illustrate the difference between fresh and decaying stock. The author compared two or three traders on selected in-game days. These ranges are neither a fixed price list nor a forecast for your current offer:
Swipe horizontally to see all columns.
| Fish | Fresh sale value | Decaying sale value |
|---|---|---|
| Burbot | 3.18–3.92 Lims | 1.36–1.50 Lims |
| Pike | 3.07–4.17 Lims | 1.27–1.40 Lims |
| Stickleback | 3.15–4.26 Lims | 1.30–1.43 Lims |
Do not build a money plan by multiplying those figures by an invented catches-per-hour rate. Bite timing, species results, vendor offers, and the time needed to return to a seller all affect the practical result. The useful decision is whether this catch has an immediate quest or restaurant purpose, and how much the current buyer offers before it decays.
Some non-fish catches have been reported as valuable. Inspect the actual item and offer before discarding everything that is not a fish, but do not assume all trash has a high sale value. There is no verified complete trash-value table or guaranteed rare-item farming method here.
Track fish discoveries without inventing locations
The finder lists all 24 species, including separate Zander and Volga Zander entries and all three named trout. Compare its names with your missing discoveries, then check the conditions revealed in your Fish Database.
This is a discovery checklist, not a table of verified spawn coordinates. The names establish what to look for in your fish records; they do not prove that every species appears at the same pier, hour, weather condition, or rod level.
The Entries interface includes fishing discovery progress. Use it alongside your inventory to distinguish a fish you have already caught from one you still need to discover. Progress and rarity records do not automatically explain how to force the next missing species to appear.
Do not conflate Volga Zander with Zander or Lake Trout with Brook Trout. Similar names are separate checklist entries, just as the fish requested by Ady are separate quantities. Read the label when a catch appears and compare it with the missing discovery rather than relying only on its picture.
Boat fishing is a later progression route
The game allows you to explore the ocean by boat, and its fishing system contributes to restaurant supply and market income. However, you do not begin with a boat. Boat ownership comes through quests, while the Seafarer achievement concerns becoming a boat captain and exploring the sea.
If a boat objective asks you to discover another area, look for marked tunnels. The documented route to new areas uses those marked passages. Follow the objective and visible navigation rather than assuming that any background water or distant skyline is an accessible district.
Boat access should not delay the free-rod shoreline route. Learn the two-click sequence and complete the first fish request from the available waters before treating sea exploration as a requirement. Exact boat acquisition costs, fuel consumption, and species-specific ocean routes are outside the verified opening fishing procedure.
Fix the most common first-fishing blockers
If you cannot start, check the failure point in this order:
- No rod in inventory: Return to Boardwalk Ady and finish the conversation that grants his free rod.
- Rod owned but not active: Open inventory with I and use the hand icon beside the rod.
- Nothing happens when casting: Confirm that the rod is equipped and the crosshair is aimed at water.
- Repeated failed catches: Watch for amber and use the second left-click at that state rather than guessing a fixed delay.
- Amber produces trash: Inspect the item; the hooked state can represent either fish or trash.
- Ady's request remains incomplete: Compare the actual species and counts with two Burbot, two Stickleback, and three Pike.
- Restaurant still lacks fish: Check the exact recipe requirement and the venue inventory; a catch in personal inventory is not yet restaurant stock.
- Expected sale value is lower: Check freshness and the current buyer's offer before assuming the earlier example range applies.
If the visible interface does not match the launch-build controls, record the game version and input method before changing unrelated settings. Make a manual save before quitting, and preserve a screenshot or short video of a reproducible failure for support. The reliable starting loop remains obtaining the rod, equipping it, casting at water, watching for amber, and checking the resulting item.
Sources and related next steps
Sources reviewed October 22, 2026. The finder preserves 24 distinct fish names. It reports only the condition records accepted within this review's source boundary, marks missing fields and area disagreements, and links to the original guides. The fish order remains a secondary quest record; sale examples remain the guide author's observations. No universal return per cast or complete current spawn table has been verified here.
- ScreenHype — fishing controls and observed conditions
- Tpose — fish conditions table
- Whisper of the House — illustrated Fish Database and scanner guide
- Prima Games — fishing controls and the 24-species checklist
- Official Update 5 and October 16 patch
For gear choices, use the fishing rod guide; for player progression, use the skills overview. For boat access, use the boat access guide. If your next task involves venue ingredient storage, continue with the venue ingredient storage guide.