
The Windows save location documented for the Nivalis Nights launch build is %USERPROFILE%\AppData\LocalLow\ION LANDS\Nivalis Nights. Open that folder through File Explorer or the Windows Run dialog, then copy its contents to a separate backup folder while the game is closed. This path is also documented by 505 Games support; it should be checked against the files created by your own save before you replace anything.
Nivalis Nights also supports Steam Cloud, manual saving from the Pause Menu, and an autosave at the end of each day. Make a manual save before quitting so that progress made since the last end-of-day autosave is included in the files you back up. Cloud synchronization helps move saves between PCs, but an edited active save can replace the cloud copy.
Open the Windows save folder
You can reach the folder without manually browsing through hidden AppData directories:
- Save your current game from the Pause Menu.
- Quit Nivalis Nights completely.
- Press
Windows + Rto open the Windows Run dialog. - Paste
%USERPROFILE%\AppData\LocalLow\ION LANDS\Nivalis Nightsand press Enter. - Inspect the contents before copying or replacing files.
The %USERPROFILE% part refers to the Windows account you are currently using. Avoid replacing it with another person's username copied from an example. If the folder does not open, check the spelling and make sure you are on the Windows account used to play the game.
An empty or missing folder is a reason to investigate, rather than a reason to create guessed save files. Launch the game normally, make a manual save, close it, and check the location again. The available launch-build information does not establish alternative paths for every store, Windows profile arrangement, or later game update. If this documented location does not contain your current save, confirm the selected account and the game's current behavior before treating another folder as authoritative.
Keep the three relevant locations separate
The game's installation directory, its active saves, and a utility's backups serve different purposes. Mixing them up can lead to backing up plugins while leaving the actual progress files unprotected.
| Location | Purpose | What to check |
|---|---|---|
%USERPROFILE%\AppData\LocalLow\ION LANDS\Nivalis Nights | Documented launch-build save location | Check the contents after making a current manual save |
Folder containing Nivalis Nights.exe | Game installation and mod-loader files | Steam's Browse local files opens this directory |
%LOCALAPPDATA%\Nivalis Save Editor\Backups | Backups created by the unofficial Save Editor | Use the editor's Backups tab to inspect or restore them |
Steam's Manage > Browse local files is useful for finding the executable and installing a mod. It does not identify the Windows save location given above. Similarly, copying a BepInEx plugin is not the same as preserving the save values that a trainer or editor may already have changed.
The Save Editor backup directory exists for that particular utility. Do not assume that installing the base game creates the editor's backups, or that every manual save automatically appears in that separate directory.
Make a complete local backup
A local backup should preserve the state before the change you want to test. This is particularly useful before adding a mod, using a trainer, editing story variables, or restoring an older save.
- Make a manual save in the game.
- Close the game before touching active save files.
- Open the documented save folder.
- Create a separate destination with a name that identifies the date and purpose, such as a backup made before a mod test.
- Copy the save folder's contents into that destination.
- Confirm that the copied files are present before changing the active folder.
- Keep that original copy until you have verified the result in the game.
Copying the complete folder avoids guessing which individual files belong to a particular slot. The launch-build information does not provide a verified list of every save filename, extension, or companion file, so a guide should not tell you to preserve only one arbitrarily named file.
Keep the backup separate from the active location. A second copy inside a folder that you are about to replace can be lost during the same operation. A separate backup also gives you a clear comparison point when an edited save is synchronized through Steam Cloud.
Name backups by the event they precede as well as the date. A file set made before a relationship edit serves a different recovery purpose from one made after that edit. This is ordinary file organization; it does not require changing the game's slot names or renaming individual save files.
Understand manual saves and autosaves
The game autosaves at the end of each day. You can also save manually at any time from the Pause Menu during gameplay. These two mechanisms protect progress at different moments.
If you have completed a conversation, restocked a venue, or changed furniture since the last day ended, save manually before quitting. Waiting for the next end-of-day autosave is unnecessary when your immediate goal is to preserve the current state. The developers specifically recommend manual saving before you leave the game.
Before making a backup, consider which state you intend to preserve. A backup made before the current manual save may omit work completed during the present day. A backup made after a trainer changes progression values preserves the modified state, rather than the clean state you may later want to restore.
Use the in-game save list to identify the progress you intend to keep. If you use the unofficial Save Editor, its save browser adds screenshots, location, in-game day, and playtime as identifying information. Those details can help distinguish an older autosave from the manual save you just created.
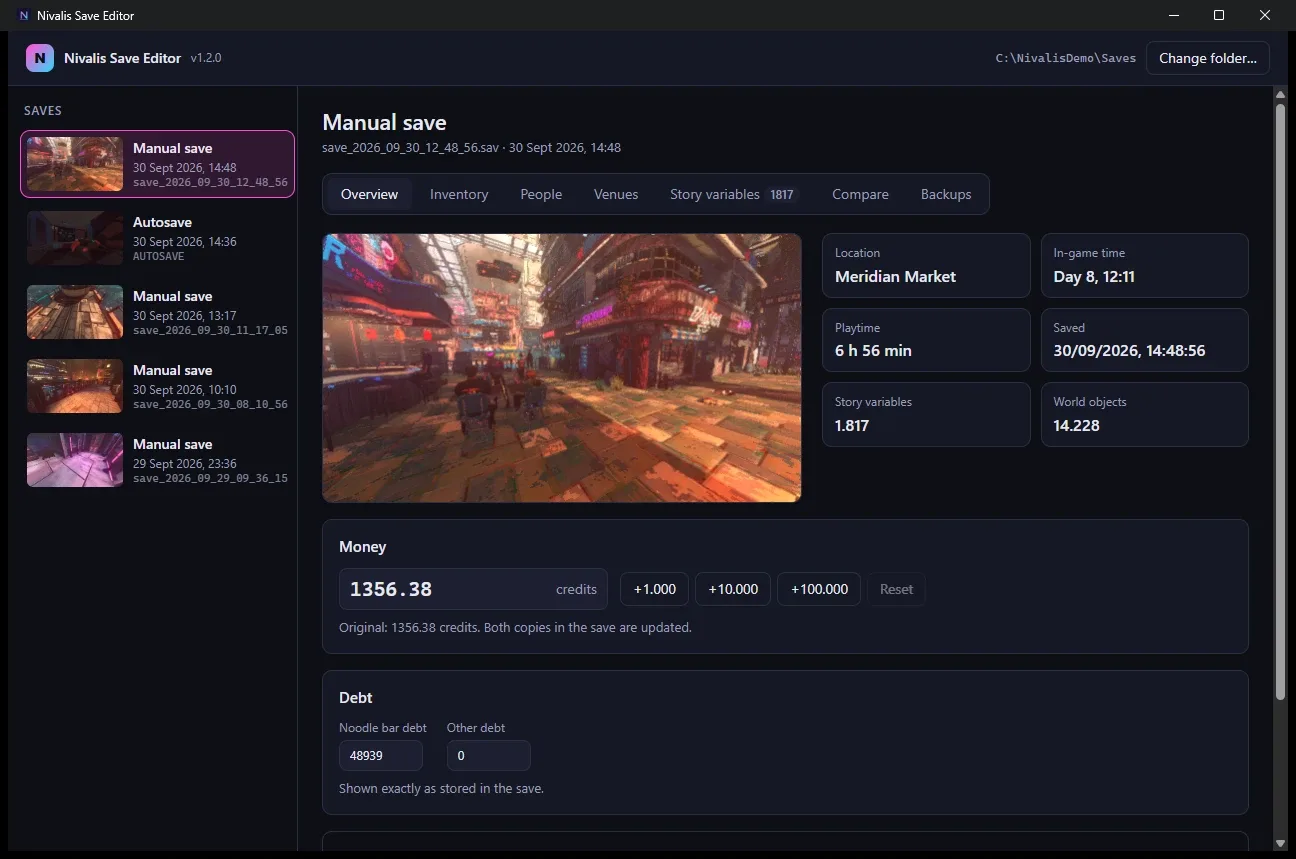
Use the save details to identify the state before a backup or restoration.
Do not interpret a save screenshot alone as proof that every desired action was recorded. Check the associated day, location, and playtime, then load the selected save in the game when you need to verify its contents. The goal is to identify the correct state before an edit or restoration, rather than simply choosing the newest-looking picture.
Steam Cloud and offline play
Nivalis Nights supports Steam Cloud synchronization between PCs. Synchronization requires an internet connection, while the game itself can be played offline. Saves made offline will synchronize the next time you are online.
This makes a separate local backup useful even when Steam Cloud is enabled. Cloud synchronization is designed to carry the active save between computers. The Save Editor author warns that an edited save replaces its cloud copy; synchronization does not automatically preserve an untouched version for you.
Before moving to another PC, make a manual save and let Steam finish its normal synchronization. On the destination PC, check that the save you load has the expected progress. If the version you see is older than expected, preserve the local copies before attempting a restore or making further progress that could obscure which state was missing.
The launch-build documentation does not specify a Nivalis-specific procedure for resolving every Steam Cloud conflict prompt. Do not choose a local or remote copy merely because it appears first. Identify the state you need using the available save information and retain a separate copy of the files before making a choice.
Cloud support also does not establish Mac or Linux support. The official launch information does not provide a native save path for either operating system. Do not substitute a similarly named folder from Cloudpunk or another Unity game for the Windows path used by Nivalis Nights.
Use Save Editor backups when you have that utility
The unofficial Nivalis Save Editor is a standalone Windows application. Its author describes up to ten compressed backups per save, with the first backup of each save retained permanently. The Backups tab lets you compare changes and restore an earlier state.
Its backups are stored outside the Steam Cloud save folder:
%LOCALAPPDATA%\Nivalis Save Editor\Backups
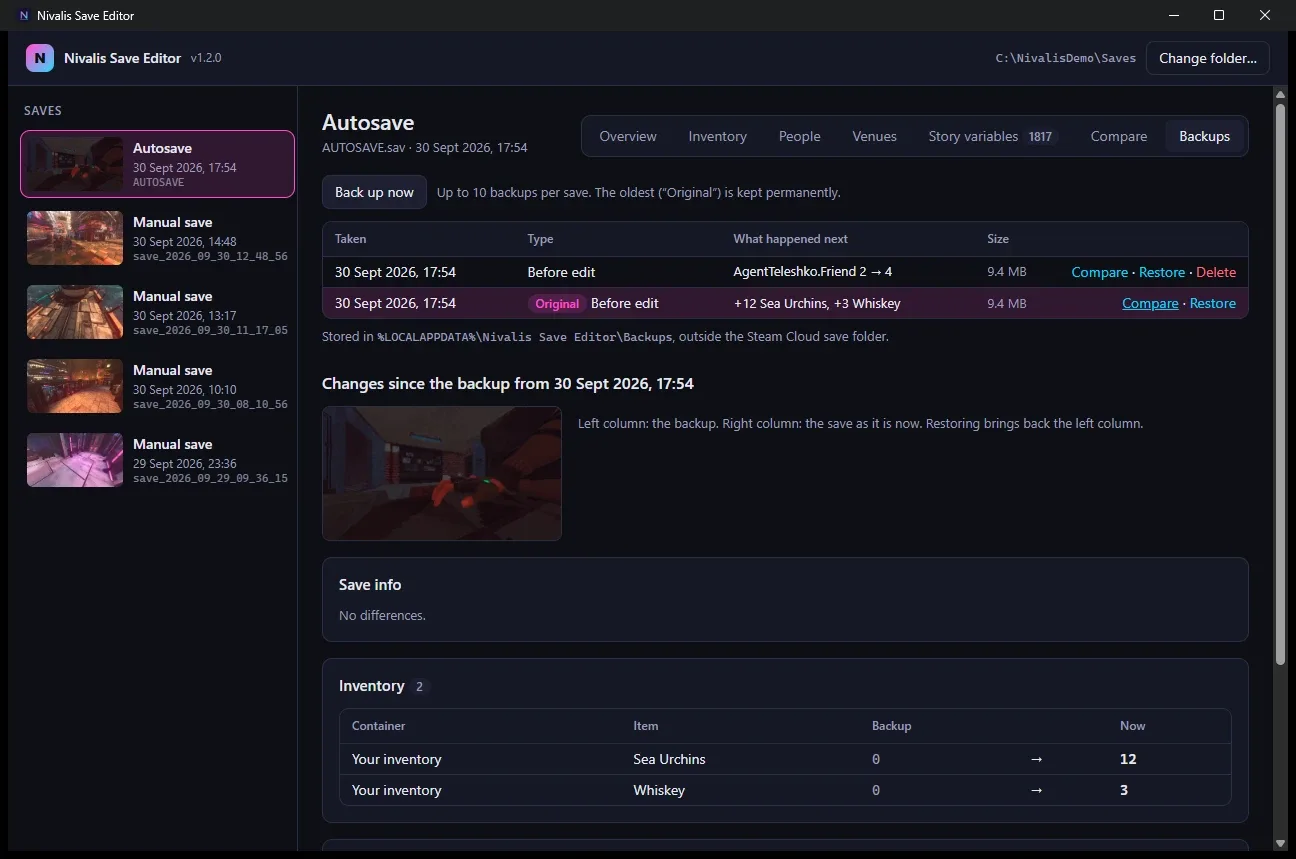
Inspect the backup from before the unwanted edit.
If the unwanted change was made through the editor, inspect its Backups tab before replacing active files manually. Choose the backup from before the relevant edit and review the comparison. An earlier timestamp alone is less informative than knowing that the backup predates the money, inventory, relationship, or story-variable change you want to undo.
Close Nivalis Nights before restoring. The editor refuses to save while the game is running, and that protection should be respected. After restoring, load the affected save in the game and check the specific result you wanted to recover.
The launch-era editor release was tested with save-format version 151 and refuses unknown formats. That is an editor compatibility statement, not an official game patch number. If a later game update changes the format, wait for a compatible editor release rather than attempting to bypass its refusal.
This page covers finding and preserving saves. Editing money, inventories, relationships, and quest flags is a separate operation with its own consequences. In particular, restoring the pre-edit backup is more reliable than guessing which story variables must be changed back.
Restore an earlier local copy deliberately
A restoration replaces your current active progress with an earlier state. Preserve the current files first, even when you believe they are damaged, so that you retain both sides of the comparison.
- Close the game.
- Make a separate copy of the current active save folder.
- Identify the backup that contains the state you actually want.
- Restore the corresponding files to the active save location, keeping their original names and folder structure.
- Launch the game and select the intended save.
- Check the day, location, inventory, or quest state associated with the reason for restoring.
- Keep both backups until the restored state is confirmed.
Do not invent a special rename scheme or a universal slot-migration command. Exact individual filenames and recovery mappings have not been verified for every save arrangement. If you cannot determine which files correspond to the intended save, use an appropriate supported backup interface or preserve the complete sets while investigating.
Restoring files is also different from removing a mod. Uninstalling a trainer can stop its menu from appearing without undoing changes written into the save. Steam file verification can repair installed game files, but it should not be treated as a rollback for edited progression values.
Diagnose missing or unexpected saves
Work through the location and timing checks before assuming that the game deleted your progress:
- Confirm that the Windows account matches the one used for the play session.
- Open the exact documented path rather than the game installation folder.
- Check whether you saved manually after the progress you want to preserve.
- Remember that the automatic save occurs at the end of a day.
- If you played offline, check the local save before relying on the cloud copy.
- If an editor refuses the save, distinguish an unknown-format error from a missing file.
- If you changed progression through a trainer or editor, compare with a backup made before that change.
If the expected state still cannot be found, retain the files and prepare a support report with the steps that preceded the problem, where it occurred, your PC specifications, and a screenshot or video when useful. Avoid repeatedly overwriting the available saves during diagnosis. A preserved file set provides a clearer recovery starting point than several untracked replacements.